Hi Everyone!
 Its been a while since last time I shared a DIY Project on Yoggi’s blog.
Today, I want to give you another resourceful idea to keep organized your bracelets and other “arm fashion”.
My bracelet organization situation has been a problem in the past, so I needed to find a way to make it functional! I’ve been collecting a lot of scrap materials, that by the way you can easily get from your local supermarket, and I think I’ve got enough for this DIY project .
I thought it would be a good idea to make something that goes with my personal style, and to make it so it would be functional for keeping my “arm candies” (jewelry) organized, but also a stylish decoration for any corner of my room!
The process is really easy and low cost!!!
So here’s my fun Do it Yourself Project idea:
Materials
- Cuter, Ruler, Glue and Scissors

- 3 Empty tubes of tin foil (you can use the tube of a kitchen paper roll or cling film if you prefer)

- Wall paper (color of your choice)

- A Box (Slide Cut) and you want to make sure your empty tin foil tubes are larger than the width of the box.
How to Make It
1. First we’ll need to cut out the desired shape for the box. I found it is much easier if you just find a already slide cut box from a supermarket, like in the picture above, otherwise just cut the box giving it a “slide/waved” shape.
2. Placing the Curving hook, the tin-foil tube:
- Take the tin foil tube on the side of the box, we’ll need to cut out “handles” for the tube to sit on top of. Place the middle of the tube on one of the sides of the box and start tracing and marking the spot. Repeat this process on the other side of the box and for all three of your tubes. Make sure the marking is straight on both sides.

- Then take the cutter or scissors and start cutting a semi-circle shape, cutting all the way to the top edge of the box, making a “hook-like” shape, like shown below:

3. Placed the empty foil tubes, making sure it fits and is straight. It should look something like this:


4. Cover the box and tubes with Wall paper or wrapping paper. Feel free to mix and match different colors or to just go for one uniform one! I actually decided to just cover the whole thing with black wall paper, both box and tubes, just so that it would be easier to recognized the colors in my bracelets and watches.
- When doing this, Prepare the box first by covering first the edges with the black electric tape or using thin strip of wall paper to wrap the edges. Start placing to the edges by pushing the tape and cutting the sides so that it looks smoother. Like this:

- Cover the rest of the box with your wall or wrapping paper.
- Do the same for the Empty foil tubes:

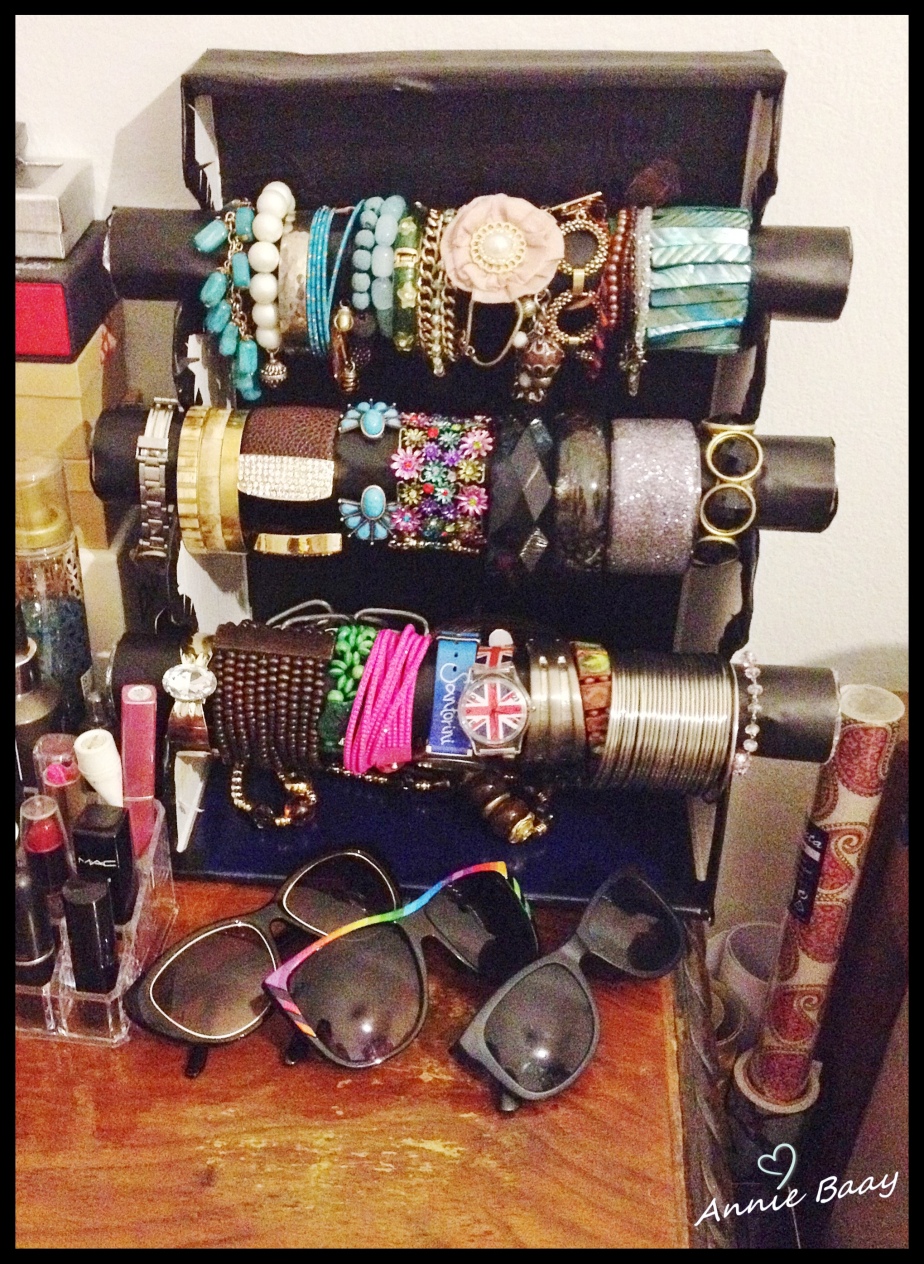
And Voila’!… Here is the finished product for the Do It Yourself 3 Layer Bracelet Holder:
Now my lovely bracelets and watches are properly displayed and I want the world to see how I did it!!!
Hope you enjoy this project.
Annie B. 🙂